
We’ve all been there ….
You start using SharePoint, and you finally feel like you’ve got the handle on it. And then, someone at work points out an issue, and you go online, search for it, and find another way to do things you didn’t know existed.
Now you’re wondering, is their way the “right” way? Did I do it “wrong” before all along? Do I have to re-do everything?
What is the right way anyway?
It doesn’t matter if you have been using SharePoint for months. Being what my customers call a “veteran,” I still find that sometimes, there are just too many options and choices.
I just happen to have the advantage of seeing which choices lead to which outcomes at hundreds of customers over the years. In this blog post, I want to share those best practices with you below.
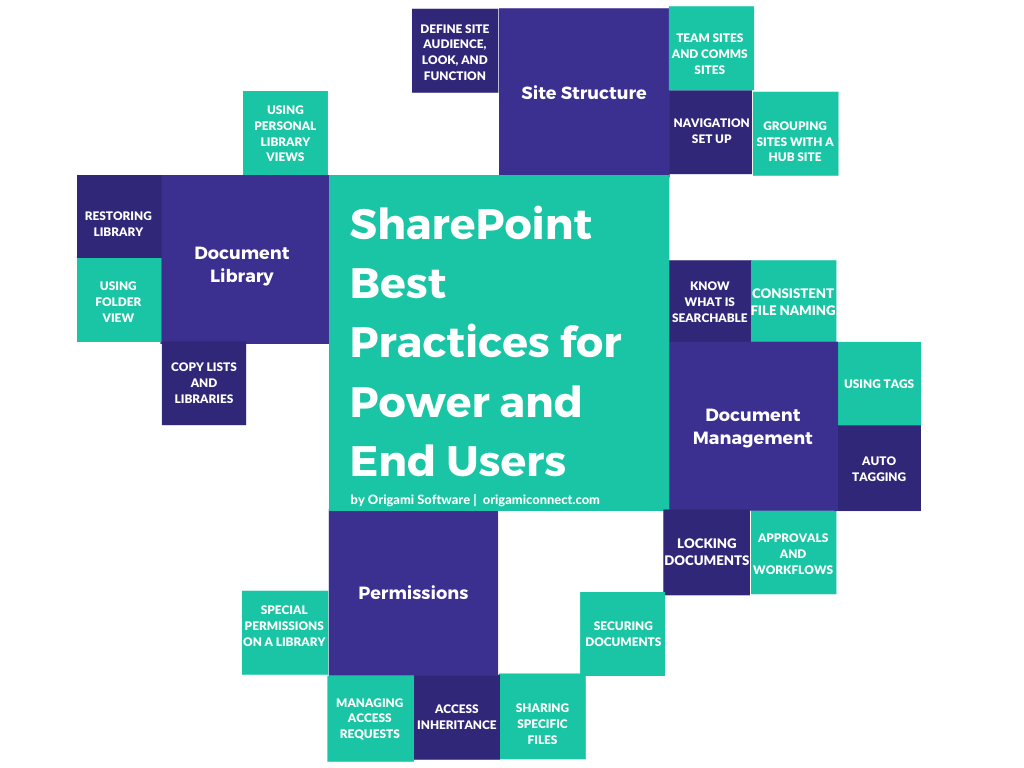
Table of Contents:
Look and Feel Best Practices
Personalize Page Banner
Make sure your quick links are bold and visible
Present long policies in the form of collapsible sections
Use brand colors across the pages (news section, collapsible sections, quick links)
Document Management Best Practices
Know what is searchable and what is not
Name files consistently (filenaming in SharePoint)
Use tags to find your documents easily
Automate metadata tagging
Approvals and workflow
Locking documents
Securing documents
Document Library Best Practices
Folder view versus flat view
Using personal views in the library
Copy SharePoint lists and libraries
Restoring library from accidents
Permissions Best Practices
Permission and access inheritance and how it works
Restricting permissions on a library
Sharing specific files
Managing access requests
Site Structure Best Practices
Have an idea first of how you want your site/library look and function before replicating it
SharePoint site navigation best practices
The difference between the Teamsite/ Communication Site/ Hub Site and when to use which
Grouping similar sites with SharePoint hub sites
Look and Feel
Best Practices
Personalize Page Banner
Think about the last email you received from someone.
Would you rather it begin with “Hey there, do I have a deal for you,” or would you prefer to see your name in the greeting?
The page banner is similar to that email greeting.
Page banners that greet each employee by name help many employees feel like the content has been made for them. This sense of personalization is more important for the Onboarding and Learning & Development areas of your intranet because it can help new employees feel welcomed.
Make sure your quick links are bold and visible
The main reason employees come to any intranet page is to find the information they need to get something done. You can make your page more helpful by placing relevant quick links close to the top of the page.
Present long policies in the form of collapsible sections
Some pages have no other choice but to be dense with content. These can be pages outlining a policy or a procedure. You can help make these pages easier to read if you break up the text into collapsible sections. Think about all the content that goes into a handbook. It’s much easier to scan for relevant headings and expand them as needed.
Use brand colors across the pages (news section, collapsible sections, quick links)
An intranet is like an internal website, and it should follow the web style guide to reflect the company brand. You don’t want your pages to look like a scrapbook because employees might question the quality and accuracy of the content. Below are some great examples of how a branded SharePoint might look like and the top tips for 2024.
Document Management
Best Practices
Know what is searchable and what is not
This comes up a lot. Sometimes you search for a document and you can’t find it but you find a whole lot of other documents you don’t need. So what is searchable and what isn’t?
If you have permissions to a specific document, you will automatically be able to search for this document wherever you are in your SharePoint site.
The search will take your keyword and match it with the file name, the title of the document and any associated tags and metadata. It will also match it with the contents inside of the document.
But here is a caveat. If you have a Word document – then it's pretty easy. If you have a PDF scan of an image – then search won't pick up any of the words inside this scan. Surprisingly, the search will pick up the text from scanned images.

Here, for example, I had some a photo of a paper, and in it, a word "Dow Jones" appeared with a list of stocks. When I search for "Dow Jones," I got a file in my results. Pretty handy to find scanned receipts and other documents.
The key to accurate search is to use more than one keyword and combine keywords to eliminate generic results.
Name files consistently (filenaming in SharePoint)
While on the subject of searchability, you'll notice obscure filename appearing in the search results just above. That’s because someone uploaded a document without changing it’s name. This can cause some confusion and a lot of clicking for users who are trying to find things and have to open every document to see if it's the right one.
One of our customers needs to keep a large volume of documents for a given client for 7 years. They found that by following a consistent file naming, they were able to reduce guessing significantly.
Your naming convention doesn't have to be complicated, but it can also save you accidental loss of data, like in the case below.
This customer had a library which contained a lot of files. Employees were saving these files directly from the application, like Word. The issue was discovered two months later when someone noticed that some files were overwritten by a “newer” file version, which was not the new version at all! It’s just that both files were named generically.
Luckily SharePoint allows you to recover files, and more on that later.
To avoid the situation above, have a talk with your team on a consistent file naming.
Using tags to find your documents easily
Since Microsoft Search picks up just about anything on your sites, to get more specific results, you can tag documents. Think of it as similar to how Netflix categorizes movies by genre or release date so you can browse that specific category.
So you can search for “invoices FY2018” and get exactly what you’d expect.
To do something like this in your SharePoint, you first need to go to the document library in which you have your documents and add a new field that will hold that category.
In my case, for example, I created a new column of type [Choice] called "Fiscal Year." After I assigned each document a specific fiscal year, now I can group and filter documents based on this tag right in the library.
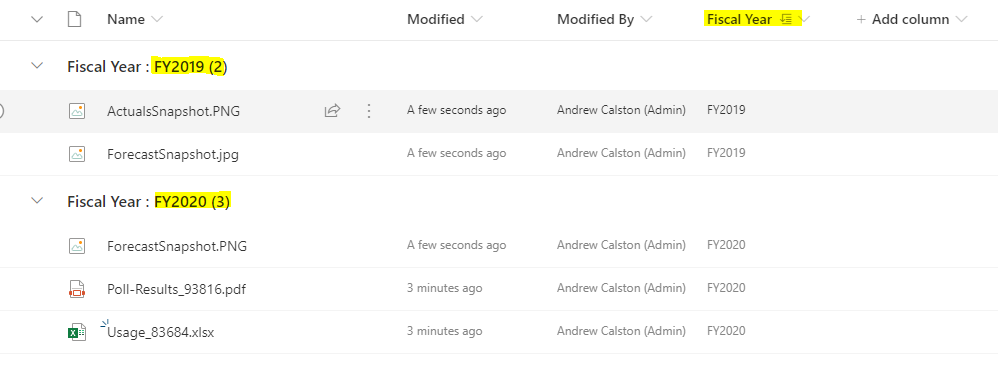
But what I can also now do, after the search picks up the new field, is to search for “invoices FY2018” and get specific results from anywhere on the site.
Automatic metadata tagging
If you have lots of files to upload and tag, you may want to set up automatic metadata tagging.
Imagine where you need to upload 100 or so documents and tag them all as FY2020, and then do the same for FY2019 and so on (not uncommon when you move from file share to SharePoint).
We use a migration tool to help customers with that but you can also use automatic metadata tagging (see our SharePoint Migration Guide).
Here is how to set up automatic metadata tagging (one-time setup):
Create a new tag for the piece of metadata options you'd like to capture (just like we did with [Fiscal Year] just prior)
If you have several metadata pieces, that's fine – create them all
Create a folder per each of the metadata piece
If you have, say 3 tags, then you'll need 3 foldersGo to [Library settings] of the document library where you have all this setup and click on the option [Column default value settings]
In my case, I have my [Fiscal Year] column, and I have 3 folders for each of the fiscal year options

4. Click on each of the folders, and click on the metadata tag, in my case [Fiscal Year]
5. Set the default value equal to the metadata tag you want to assign when files are dropped into the folder
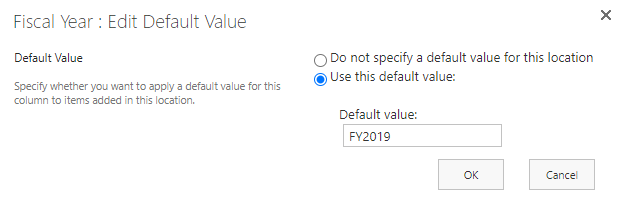
Now, each time you drop documents into the folder, they will get automatically tagged with a default metadata.
You might say, so what, now I have folders in my document library, I don’t want that.
Keep reading the [Document Library Best Practices], where we talk about how you can switch to a no-folder view while still maintaining folders.
Approvals and workflow
Approval on documents is the most common request customers need to manage documents. For example companies use fill-in forms to initiate and approve vacation requests - approval is an excellent way to track those requests.
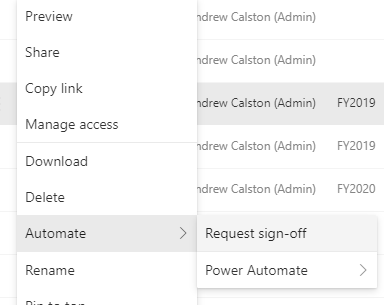
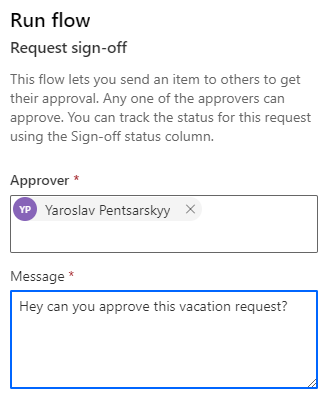
You can create a pretty basic approval workflow right from your library by selecting the file you'd like to approve and clicking [Automate] -> [Request sign-off]
The sign off will start, and it's pretty easy for approvers to understand what to do next.
If this basic approval workflow is not enough, and you’re probably already thinking of at least a few additional steps you’d like to see in your workflow, that’s ok. You can create a custom workflow right from the library.
Click [Automate] -> [Power Automate] -> [Create a Flow] right from your library
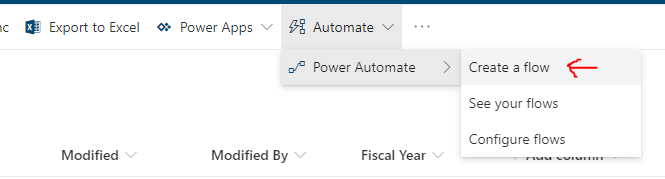
The most common workflow option is [Request manager approval for a selected file], but you can customize your workflow to do virtually anything.
The only caveat is that for some of the advanced customizations, you might need a developer to help you out.
Here is a handy solution one of my customers built with a little no knowledge of development:
A workflow that sends an email to an author of a document when the author forgot to tag that document 30 minutes after it was created. A pretty automated way to enforce governance!
So by all means, feel free to explore what’s available out-of-the-box.
You will be redirected to Microsoft Power Automate to design your workflow. This is where we build more complex scenarios for customers ranging from complex approvals to automating audit tasks on a given schedule.
Locking documents
Often you need to make it so a document in a library is still viewable, but nobody can change it or make any update to its.
In other words, you need to lock a document.
Using SharePoint permissions for this often turns into a nightmare because there is no indication for everyone except the owner that this document has special access like that. And what if you need to unlock it at a later date?
Luckily there is a solution for this, and it's called [Declaring an in-place record].
Here is how to set it up on a library (one-time setup):
Go to the site where your document library is residing and go to [Site Settings] of that site
Click [Site collection features] and activate the feature called [In Place Records Management]
Now go to the library where you want to enable this locking. Go to this [library settings]
Click [Record declaration settings] and select an option for [Always allow the manual declaration of records]
That's it for the one time set up.
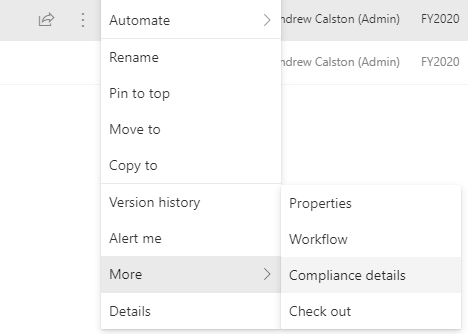
Now, users can simply go to the library and declare a record by selecting a file and going to [More] -> [Compliance details] -> [Declare as an in-place record]
(same steps to undeclare the record, provided the user is allowed to do that)
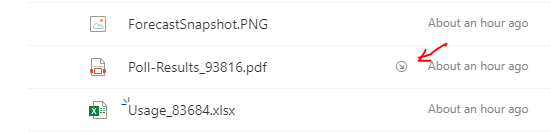
As a result, the file will be locked, and everyone can see its special status with an icon displayed next to its name
This setting is incredibly convenient if you combine it with an automated workflow that locks documents once approved. It eliminates the need for creating PDF for approvals.
Another solution we've built for a customer involved locking documents automatically when they were transferred from their financial system into SharePoint for archival.
Securing documents
Many of our customers are organizations with teams in multiple geographies who have restricted access to the content they should be viewing. For example, employee benefits would be best kept separate unless they are all the same for everyone.
Microsoft search allows employees to search just about anything they have access to. And so, you can inadvertently share something that shouldn't be public, and it can be found just because someone searched for something and accidentally found your document.
I hear stories like that all the time. Hoping this won’t happen is not a solution for you.
The best way to avoid this is to:
Share permissions by using existing groups: Site owners, Site members, and Site visitors.
When you add new employees or groups to either Site owners, members, or visitors, SharePoint will take care of the rest and set permissions on libraries within your site.
What you want to avoid is creating your own groups and adding people to them. These new group members won't have access to libraries that have unique permissions. Why would these libraries have unique permissions, you might ask, keep reading the next bullet point.Be aware that unique library permissions can get created without your knowledge
Every time you use the [Share] option on a file like the one shown below, SharePoint creates unique permissions for the library containing this document.
You may not know it, but behind the scenes, Microsoft stops inheriting access from the site. This might not be an issue unless, of course, you have custom security groups, explained above.

Separate sites with external sharing enabled
It might surprise you, but your employees might be allowed to share files with folks outside of your organization and don't know about it. Microsoft provides a lot of flexibility to get this done, and some IT managers are surprised that these links linger around as unsecured email messages prone to phishing attacks.
External sharing is a hot button with the organizations who work with external agencies like auditors or contractors.
If you need to share documents with, say auditors, it might be best to do it in SharePoint than say Dropbox.
So how do you avoid potential breaches?Create a separate site with lower security clearance, and if your employees need to share anything, they can share it on that site.
Use automatic link expiration when sharing a file, say 30 days, to prevent access to files after that period of time.
More of the subject of security best practices is in the section on permissions, so keep reading.
Document Library
Best Practices
Folder view versus flat view
You probably noticed that you could create a folder in your document libraries. This is very handy.
With the folder, you have everything organized as-if it was on your computer, but sometimes you can't find a file until you click through several folders. And if you have folders within folders, then forget about it.
Ok, so what about having no folders at all?
Flat library views, as they call them, can be great, but if you have a library with many documents, you might have to scroll a lot.
Also, if you didn't use the naming convention and metadata tagging, sometimes it might be hard to find the file you're after.
The solution: have both a flat view and folder view!
Here is how to set this up (for the first time only):
In your library, under the right-hand side dropdown called [All Documents], you will see an option to [Save view as].

Give it a new name such as [All Documents – No Folders]. Now edit this view using the option from the same menu.
On the next page, scroll down to the section called [Folders]
Pick an option to [Show all items without folders] and save the view.
Now your employees will have two options, the one with folders and the one without. They can quickly switch between the two to see the whole folder at a glance in a flat view.
Using personal views in the library
While creating a new view in the previous example, you might have noticed that there is a lot of filters and toggles that employees can use to filter and manage documents.
Some of the most popular options are:
Ability to show additional metadata details
Sorting of files in a specific order
Filtering out files
Grouping files by one or more groups (enabling to drill down the file view)
If most employees have the same needs, then you can create a public view for everyone to share.
If employee needs are specific, they can create a personal view only available to them. This way, they don't disturb the library view for everyone else but have access to their view.
To create a personal view, an employee has to do it. They’d use the same steps we did in creating a [No Folder view] but wouldn't select [Make this a default view] when saving the view.
This will create a view available only to that employee who created it.
Copy SharePoint lists and libraries
Many customers I speak to had this challenge for years: they create a library or a list, add metadata to it, create views and so on. This sometimes takes hours. But then, they need exactly the same list or library elsewhere, and it takes them that much time again to build one.
Well, not anymore. You can copy the list from any site you have access to, and most of the configuration will come with it.
To do that:
Navigate to the site where you'd like the new list to be
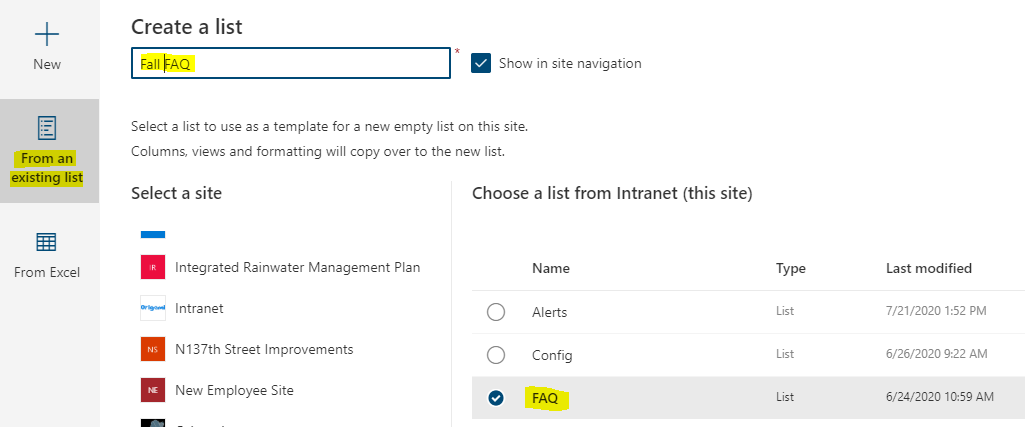
Go to [Site contents], and click [New] -> [List]
Give it a name and click on the [From an existing list] tab
Now, you can pick any list on any site you have access to
Click [Create], and the list will be copied from the existing one.
Note: The data (incl. documents) from the original list won't be copied.
Restoring library from accidents
A month ago, one of my customers called me frantically asking if there is any way to restore the data they lost in SharePoint. After asking how and when they had lost it, I learned that this data was lost in a document library. Some files were deleted by a workflow that was built in-house and malfunctioned.
A few months earlier, a similar situation happened at another customer.
Luckily you can now restore a document library with ease and precision.
Here is how:
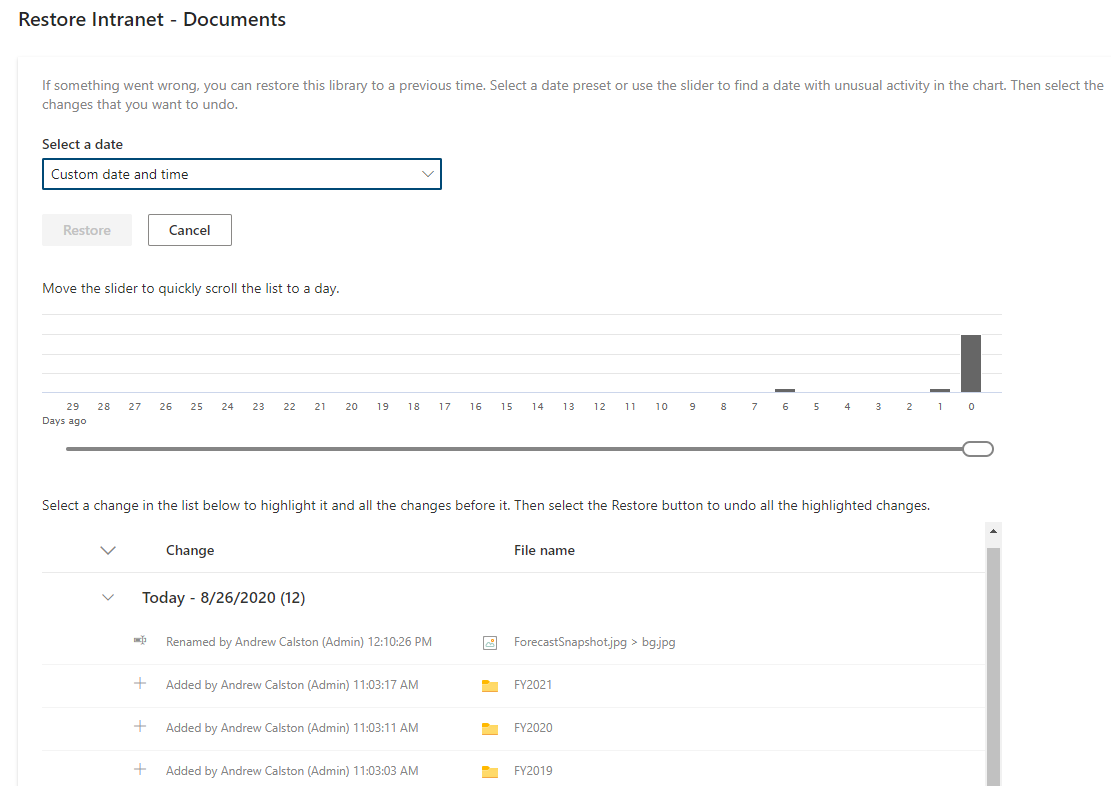
Navigate to the library where the accident happened
Click the [Gear] -> [Restore this library]
You'll be prompted to select a period and start the restore process
You can even see the trail record of what happened when so you know which day you should roll back changes to.
Warning: remember that by restoring to an earlier point, you will lose everything past that point, so you might want to back up the new changes first before kicking off the restore process.
Permissions
Best Practices
Permission and access inheritance and how it works
As mentioned earlier, sometimes permissions set the wrong way can expose documents through search to more people than intended. Employees may not even know how to get to the document but still see it in search results.
This chance-taking is not for you.
Here are the ways to remember and protect against that:
Files in folders (if you have folders) take their permissions from the folder
Unless you've shared this file with someone individually by using the [Share] option– only people who have access to the folder will have access to files in it.
Folders, in turn, inherit their access from the document library
Library inherits permissions from the site
Keep the inheritance this way unless you have needs described in next section on [Restricting permissions on a library]
The site is at the top of the permission hierarchy. Permissions set here will trickle down to all of the items on that site.
There are three permission levels as discussed earlier [Site owners], [Site members], and [Site Visitors]
Restricting permissions on a library
In specific scenarios, you may want to limit access to the library on the site. One of my customers has a SharePoint site for a management team, but there are a couple of libraries on this site that are only available for executives.
First, be sure that if there is a library like that in your site, you give it a name and description that clearly specifies it's special status.
For example, you can call it [Financial Forecasts (Partners Only)]. This will indicate to admins and members of the Partner group that this library is only visible to them.
To limit permissions on the SharePoint library:
Navigate to the library on that site and access the [Library settings] from the [Gear] menu
Click on the [Permissions for this document library]
In here, click [Stop Inheriting Permissions] in the ribbon

4. Now you can click [Grant Permissions] in the ribbon to invite specific people to this library
Be sure to click [Show options] to make sure you're giving these people or groups the right level of access [Read], [Contribute], or [Full Control] are recommended. Ignore the other permissions options – they come from legacy SharePoint version and have nothing to do with what we intend here.
5. Once shared, you also want to remove groups and people that shouldn't have access to the library.
WARNING: Instead of going into the group and removing people in that group, remove the group itself. One of my customers went into the group to pick users they didn't want, but that group is re-used on the site level, and these users lost access not only to the library but to the entire site.
WARNING #2: Be sure you don't remove the group you are a member of. Otherwise, you will lose access literally in the midst of making this change. If this happens, ask the site collection administrator (or IT) to add you back into the site.
If you made a mistake and want to roll back permission changes, you can click [Delete unique permissions] while in the library settings and start over.
Sharing specific files
As we looked at earlier, employees who have access to the site may be able to share files with others by using the [Share] function on a file. But since we now know that sharing a file this way exposes it to search results, you may want to restrict this option to be only available to owners or members group.
Here is how to do that:
While on the site which you want to restrict file sharing, click on [Gear] -> [Site permissions] -> [Change how members can share]
In here, the most restrictive option is for the site owners to be able to share files and the site

If you want to enable the more permissive option for site members to be able to share files, keep reading to the next section, which will explain how to manage access requests.
Managing access requests
Often employees will go about their day, and then when they need to share a file with someone, they’d copy a URL from their browser, send an email with it to others who may not have access to this file.
When this happens, the recipient will get this error.

This error means that employees can ask for access if they don’t have one on this site.
This is great, but often customers don't have this step setup right, and sometimes employees don’t know who will grant their access and when.
When site owners are notified of this message, they often don't know what to do and whether another owner already actioned this request. The more owners get this access request email in parallel – the more they will think someone else might do something about it.
The result: your employees might never be hearing back from the approver.
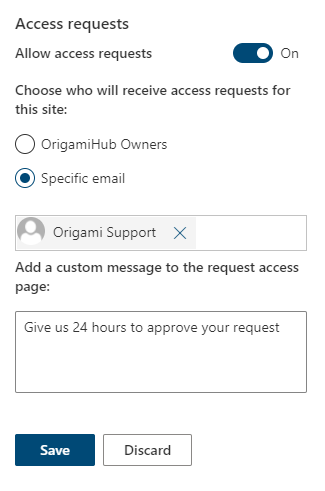
The option I've seen work much better is when a specific support email address is specified to handle these access requests.
To set this up:
Go to the site, you'd like to configure access requests for
Click [Gear] -> [Site permissions] -> [Change how members can share]
Set the specific email you'd like to send this access request to. You can provide optional details here too.
Read more in SharePoint security best practices blog post.
Site StructureBest Practices
Have an idea first of how you want your site/library look and function before replicating it
Chances are your employees have various experience with the technology when they join your company.
Some are very familiar. Others didn’t use SharePoint that often and are more familiar with a file share structure and find it frustrating when SharePoint takes an extra few clicks or an extra few seconds to load.
One of my customers found that the #1 key to success in their SharePoint adoption was to know your employees and what they are used to, so you can tweak the settings to reduce resistance to everyone's adoption.
What this means is by knowing your employees, you can map out how you'd like to see the entire site before you create it. Some customers get themselves in a bit of a mess by reactively creating document libraries and sites only to remove them later.
It’s a considerable waste of time. And this is not for you.
Studies found that when SharePoint sites are built without planning, they get only about 43% of user adoption. In contrast, with planning, you get 80 - 85% of user adoption. We measured this trend with a few of our customers and can confirm that these numbers are real. And this is why content planning is at the core of what we do when setting up Origami.
So what does a typical content map look like. I'll show an example of the HR content map below (created for the post on How to create a killer HR Portal SharePoint site). It's worth noting that for this map to be useful, it needs to reflect your content and your employee usage patterns.
When running content planning workshops for customers, we brainstorm in a workshop:
What will the site do for employees
What content is needed to fulfill that purpose
How do we group similar content in an intuitive way
When done, we create a content map similar to this one.
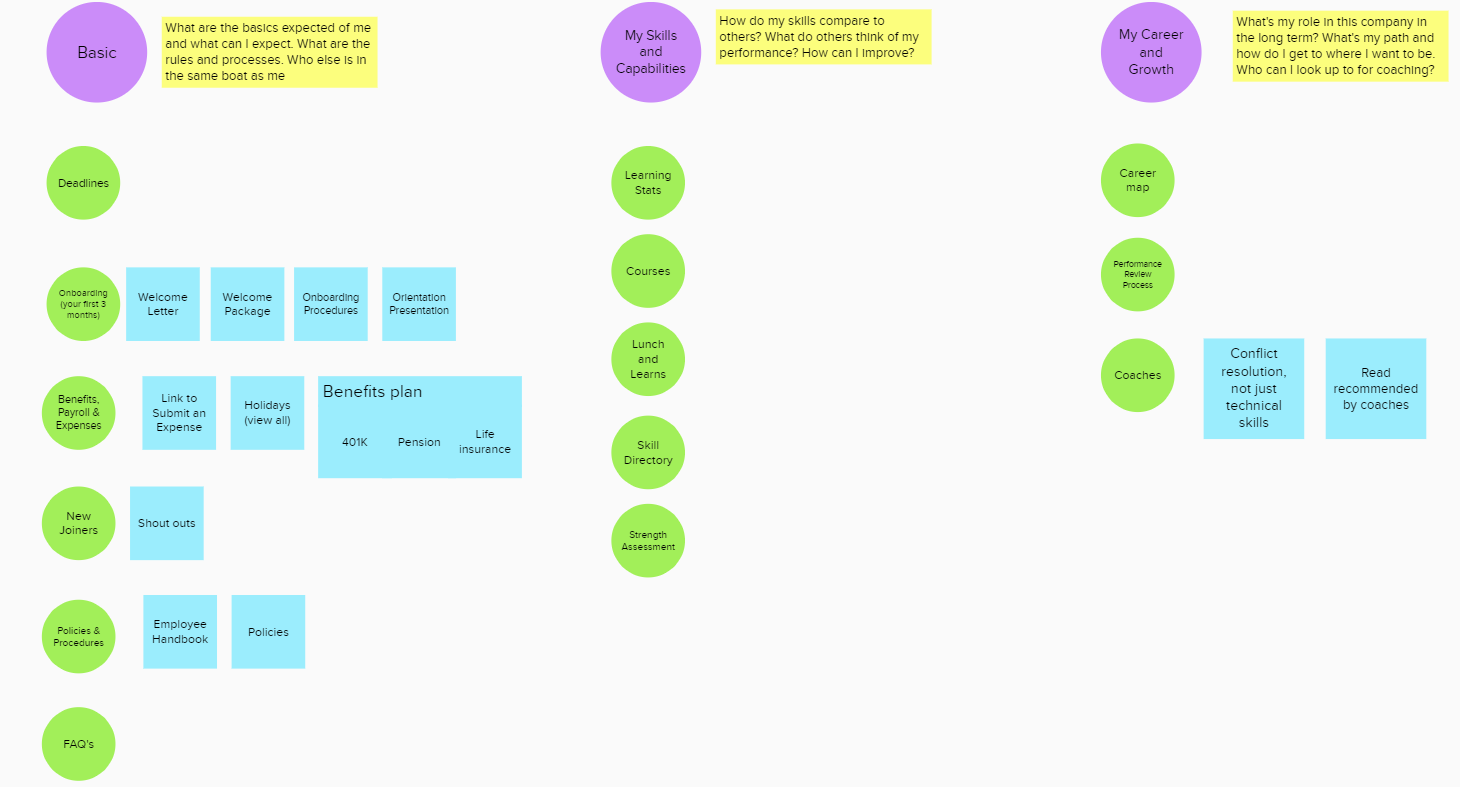
In this diagram:
the purple elements are sites
the green ones are libraries under each of the sites
and the blue squares are examples of content under each library
The final step in any design or mapping is to do user testing, which at the core of getting that 40% increase in adoption. Keep reading on to learn more about it.
SharePoint site navigation best practices
When we do the ease-of-use testing for our customers (after the content planning workshops), we get a real good feel of how people interact with the content.
In addition to measuring how people think when they click different site pages, we also ask them how did it all feel for them.
We have over 3,000 responses in our database right now, and among other valuable data, here is what people say as it relates to their navigation:
"Access to any information page should be a maximum of 2 clicks."
"Many of [the apps] should just be on the homepage as opposed to being nested down under a specific category."
“It seems to be very hard to find something on the intranet. Once you have been there at that site, you know where it is until [they] move it.”
"Lots of old links on the Intranet.”
Many employees find that intranets have way too many things on their homepage, resulting in people struggling to find what they need. When things get too busy, the content owners decide to move it – ironically, this is when users finally get a grasp of where things are.
So here are the best practices:
Keep your navigation structured by function, not departments
There is a detailed post on this backed up by data coming from studies we’ve done with several customers. Few benefits of that:
Your top navigation will remain consistent as you add new content
When departments change – you won’t need to update the navigation
New employees not yet familiar with your org structure will find it easier to navigate the site
Structure your navigation according to employee needs, instead of the best guess
Here is another post that will get you started on how to identify employee needs and has examples of a homepage built according to those employee needs. Few advantages of that:
Employees will find your content more relevant
You will eliminate unused content
Your adoption rates can increase by as much as 90% on a home page and key pages of the site
The difference between the Teamsite/ Communication Site/ Hub Site and when to use which
Now that we know the best practices on how the sites should be structured, it’s time to create them.
But which site template should you use?
SharePoint has two main types of site templates: the Team Site and the Communication Site.
Think of them as basic building blocks, and of course, you can have different kinds of templates based on your needs: like HR site, project site etc. This is how we install templates for Origami, by building on top of those basic blocks.
But what is the difference between these two initial types of sites?
Communication Sites versus Team Sites:
Use Communication Site to:
Broadcast message to a broad audience of employees. Example: a product launch, HR landing site, internal event promotion, community or program announcement
Have a small number of contributors (typically members of communications or organizer team) and a large number of readers (usually all employees)
Visually, have a full-width screen to show more content. See these templates and examples for how a modern SharePoint communications site looks like. One key visual distinction: a communications site doesn’t have left navigation.
Use a Team site to:
Collaborate with a small group or team on a task-oriented activity. Example: a project or a portfolio
Have most users who have access to the site, also being able to contribute content
Have associated Team Site calendars (accessible via Outlook), Microsoft Planner links, MS Team channel, OneNote etc
Visually, focus users on libraries and lists. The team site will have left navigation, allowing employees to switch between libraries easier.
Grouping similar sites with SharePoint hub sites
When it comes to sites in SharePoint, they are all like leaves on the ground, all pretty much the same. Now, imagine being an employee who’s trying to find that one particular leaf all spread around the grounds.
Hub sites allow you to group these related sites in a sort of virtual group with a few added benefits.
So when would you need to group sites?
In our workshops with customers, when we define the content (as you’ve seen in the example with HR site), we determine what's common between these sites.
Let’s say we’ve decided that the customer needs a site for every portfolio or a project. We then group these project sites under one hub site dedicated to projects.
In a way, a hub site becomes a landing site for all of the projects. In this scenario, we’d make the hub site a communication site where it’ll have a project directory, and all of the projects under it would be Team Sites/ project sites.

What else does the hub site gives you:
Consistent navigation across sites belonging to this hub site, so employees can’t accidentally change the navigation setting
Consistent theme color and logo is taken from the hub site
You can roll up tasks and news published on a specific team site into the hub site. Imagine rolling up status from all projects into the main project KPI.
When you search the hub site, information from its members will come up in search results
Have a best practice not mentioned here? Share it!
Did you like the ideas used in this post? Those are part of Origami intranet process.
You can get in touch to have a chat about redesigning your SharePoint intranet. Our enterprise customers often say that our design workshops and content planning are two of the most crucial contributors to the success of their intranet redesign and significantly higher user adoption.

Yaroslav Pentsarskyy is a Digital Workplace Advisor at Origami. Yaroslav has been awarded as Microsoft Most Valuable Professional for 8 years in a row and has authored and published 4 intranet books.
Yaroslav is also a frequent presenter at industry conferences and events, such as the Microsoft SharePoint Conference and Microsoft Ignite.